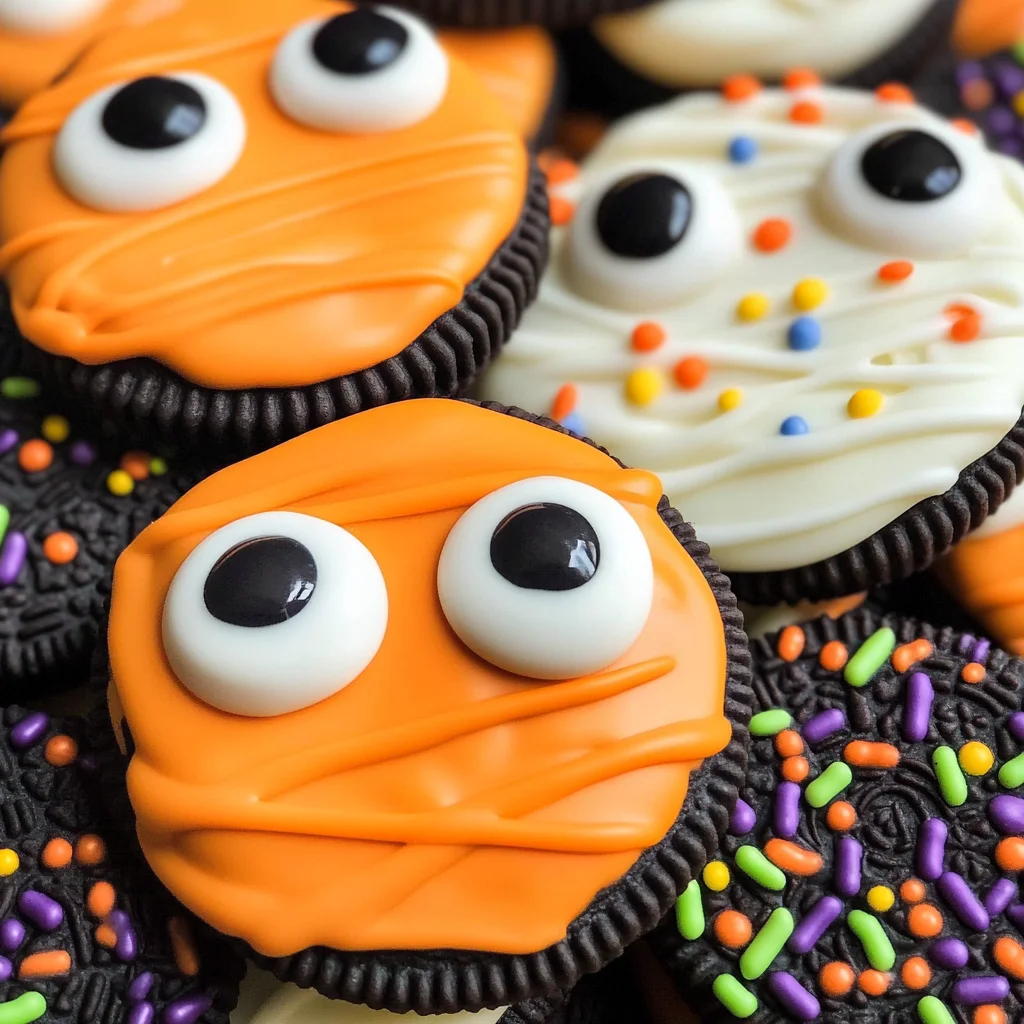
Easy Halloween Dipped Oreo Cookies Recipe
Spookiness just got a sweet twist! Delight and fright with the Easy Halloween Dipped Oreo Cookies Recipe. These fun treats are perfect for Halloween parties, school events, or just a cozy night in. With their vibrant colors and playful designs, they will surely be a hit among kids and adults alike.
Why You’ll Love This Recipe
- Quick to Prepare: This recipe takes only 25 minutes from start to finish, making it an easy addition to your Halloween festivities.
- Creative Fun: Kids can help decorate these cookies, allowing for family bonding while being creative in the kitchen.
- Versatile Designs: With different colors of candy melts, you can create spooky mummies or silly monster cookies based on your theme.
- Delicious Flavor: The combination of rich chocolate and sweet candy melts makes every bite irresistible.
- Perfect for Sharing: With 36 cookies per batch, these treats are ideal for sharing with friends or at gatherings.
Tools and Preparation
Before you dive into making these delightful cookies, gather your tools. Having everything ready will make the process smoother.
Essential Tools and Equipment
- Baking sheet
- Wax paper or parchment paper
- Microwave-safe bowl
- Fork
- Spoon
- Piping bag (optional)
Importance of Each Tool
- Baking Sheet: This is essential for cooling your dipped cookies without them sticking together.
- Wax Paper or Parchment Paper: Lining your baking sheet prevents sticking and makes cleanup a breeze.
- Microwave-Safe Bowl: Perfect for melting candy melts evenly without burning them.
- Piping Bag: Great for adding detailed designs like mummy wraps on the cookies.
Ingredients
To create these fun Halloween treats, you’ll need the following ingredients:
For the Cookies
- 1 package Halloween Oreos (or any type of sandwich cookie)
For Dipping
- 6 oz chocolate melting wafers
- 6 oz orange candy melting wafers
- 8 oz white candy melting wafers
- 6 oz purple candy melting wafers
For Decoration
- Sprinkles and candy eyes
How to Make Easy Halloween Dipped Oreo Cookies Recipe
Step 1: Prepare Your Work Area
Line a cookie sheet with wax paper or parchment paper to ensure easy removal of your finished cookies.
Step 2: Melt the Candy Melts
Melt the different colored candy melts in a microwave-safe bowl. Heat them in 30-second increments until fully melted (approximately 1 minute).
Step 3: Dip the Oreos
Take one Oreo and dip it into your chosen melted candy. Use a spoon to cover the entire cookie. Lift it out with a fork, gently tapping on the side of the bowl to remove excess coating.
Step 4: Decorate Immediately
Transfer the dipped cookie onto the lined baking sheet. Before the coating hardens, sprinkle with decorations like sprinkles and add candy eyes.
Step 5: Let Them Harden
Allow the cookies to set for about 1 hour. If desired, use a piping bag with a small tip to create mummy designs after they have hardened completely.
Now you’re ready to enjoy your Easy Halloween Dipped Oreo Cookies!
How to Serve Easy Halloween Dipped Oreo Cookies Recipe
These Easy Halloween Dipped Oreo Cookies are perfect for any spooky celebration. Here are some fun serving suggestions to make your treat table extra festive.
Fun Party Platter
- Create a colorful platter by arranging the dipped Oreos alongside other Halloween-themed treats like gummy worms and candy corn for a vibrant display.
Individual Treat Bags
- Pack each cookie into small, clear treat bags tied with orange or purple ribbons. Great for handing out to guests or as party favors!
Halloween Dessert Table
- Set up a dedicated dessert table filled with your cookies, themed cupcakes, and ghost-shaped marshmallows. Use spooky decorations to enhance the theme.
Cookie Decorating Station
- Allow guests to decorate their own cookies using extra sprinkles and melted candy. This interactive option is sure to delight children and adults alike!
How to Perfect Easy Halloween Dipped Oreo Cookies Recipe
Making these cookies is simple, but here are some tips to ensure they turn out perfectly every time.
- Use Quality Melting Wafers: Choose high-quality melting wafers for better taste and smoother coating.
- Keep Ingredients at Room Temperature: Let your Oreos sit out for a few minutes before dipping them, ensuring the coating adheres well.
- Don’t Rush Melting: Microwave in short bursts and stir frequently to avoid burning the chocolate or candy melts.
- Add Toppings Quickly: Sprinkle toppings on while the coating is still wet for better adhesion.
- Chill the Cookies: If you’re in a hurry, placing the finished cookies in the fridge can speed up the hardening process.
Best Side Dishes for Easy Halloween Dipped Oreo Cookies Recipe
Complement your delicious cookies with these side dishes that fit perfectly into your spooky celebration.
- Pumpkin Spice Cupcakes – Moist cupcakes topped with creamy pumpkin spice frosting that scream fall flavors.
- Ghostly Meringues – Light and airy meringue cookies shaped like ghosts, perfect for adding a whimsical touch.
- Witch’s Brew Fruit Salad – A mix of seasonal fruits served in a cauldron-like bowl adds freshness alongside your sweets.
- Caramel Apple Slices – Crisp apple slices drizzled with caramel sauce provide a crunchy contrast to the cookies.
- Spooky Cheese Platter – An assortment of cheeses shaped like bats or pumpkins, paired with crackers for savory balance.
- Monster Marshmallow Pops – Marshmallows dipped in chocolate and decorated with candy eyes make adorable accompaniments.
Common Mistakes to Avoid
When making the Easy Halloween Dipped Oreo Cookies Recipe, it’s essential to avoid common pitfalls that can affect the outcome.
- Skipping the Melting Process – Ensure you melt candy wafers completely for smooth coating. If they are not melted properly, it will be difficult to dip and coat the cookies evenly.
- Not Decorating Quickly – Decorate your cookies immediately after dipping. The candy coating hardens quickly, and if you wait too long, sprinkles and eyes won’t stick.
- Using the Wrong Container – Use a microwave-safe bowl for melting candy melts. Avoid metal bowls as they can cause uneven melting and may damage your microwave.
- Overloading with Toppings – While toppings add fun, too many can make the cookies messy. Keep it simple and let creativity shine with just a few decorations per cookie.

Storage & Reheating Instructions
Refrigerator Storage
- Store cookies in an airtight container for up to 1 week.
- Keep layers of parchment paper between cookies to prevent sticking.
Freezing Easy Halloween Dipped Oreo Cookies Recipe
- Freeze in an airtight container for up to 3 months.
- Separate layers with wax paper to maintain shape and prevent sticking.
Reheating Easy Halloween Dipped Oreo Cookies Recipe
- Oven – Preheat to 350°F (175°C), place cookies on a baking sheet for about 5 minutes until warm.
- Microwave – Heat one cookie at a time on a plate for 10-15 seconds. Watch closely to avoid melting too much.
- Stovetop – Place a pan over low heat and warm cookies briefly until just soft.
Frequently Asked Questions
Here are some common questions about the Easy Halloween Dipped Oreo Cookies Recipe.
How long does it take to make Easy Halloween Dipped Oreo Cookies?
The total time is approximately 25 minutes, which includes both prep and cook time.
Can I use different types of Oreos?
Yes! Feel free to use any flavor of sandwich cookie you like for your Easy Halloween Dipped Oreo Cookies Recipe.
How should I store leftover dipped Oreos?
Store them in an airtight container at room temperature or refrigerate them for longer freshness.
Can I customize my toppings for these cookies?
Absolutely! You can use different sprinkles, edible glitter, or even drizzle melted chocolate over them for added flair.
Final Thoughts
The Easy Halloween Dipped Oreo Cookies Recipe is perfect for adding sweet fun to your spooky celebrations. With endless customization options, you can create unique designs that cater to any theme. Don’t hesitate to try this recipe—it’s sure to delight everyone at your Halloween gathering!
Easy Halloween Dipped Oreo Cookies

Spookiness meets sweetness in this Easy Halloween Dipped Oreo Cookies Recipe! These vibrant, playful treats are not just perfect for Halloween parties but are also a delightful activity for family bonding. With a quick 25-minute prep time, you can create colorful cookie masterpieces that will thrill both kids and adults alike. Imagine rich chocolate Oreos coated in a rainbow of candy melts, decorated with fun sprinkles and candy eyes, making them ideal for sharing at gatherings or festive events. Let your creativity shine as you whip up these easy, no-bake cookies that are sure to be the highlight of any celebration!
- Prep Time: 15 minutes
- Cook Time: 10 minutes
- Total Time: 25 minutes
- Yield: Approximately 36 servings 1x
- Category: Dessert
- Method: No-Bake
- Cuisine: American
Ingredients
- 1 package Halloween Oreos (or any type of sandwich cookie)
- 6 oz chocolate melting wafers
- 6 oz orange candy melting wafers
- 8 oz white candy melting wafers
- 6 oz purple candy melting wafers
- Sprinkles and candy eyes for decoration
Instructions
- Line a baking sheet with wax paper or parchment paper.
- In a microwave-safe bowl, melt the assorted candy melts in 30-second increments until fully melted.
- Dip each Oreo into the melted candy using a fork, then tap off excess coating.
- Place the dipped cookies on the lined baking sheet and decorate immediately with sprinkles and candy eyes.
- Allow cookies to set for about 1 hour before serving.
Nutrition
- Serving Size: 1 serving
- Calories: 140
- Sugar: 12g
- Sodium: 45mg
- Fat: 7g
- Saturated Fat: 4g
- Unsaturated Fat: 2g
- Trans Fat: 0g
- Carbohydrates: 17g
- Fiber: <1g
- Protein: 1g
- Cholesterol: 0mg