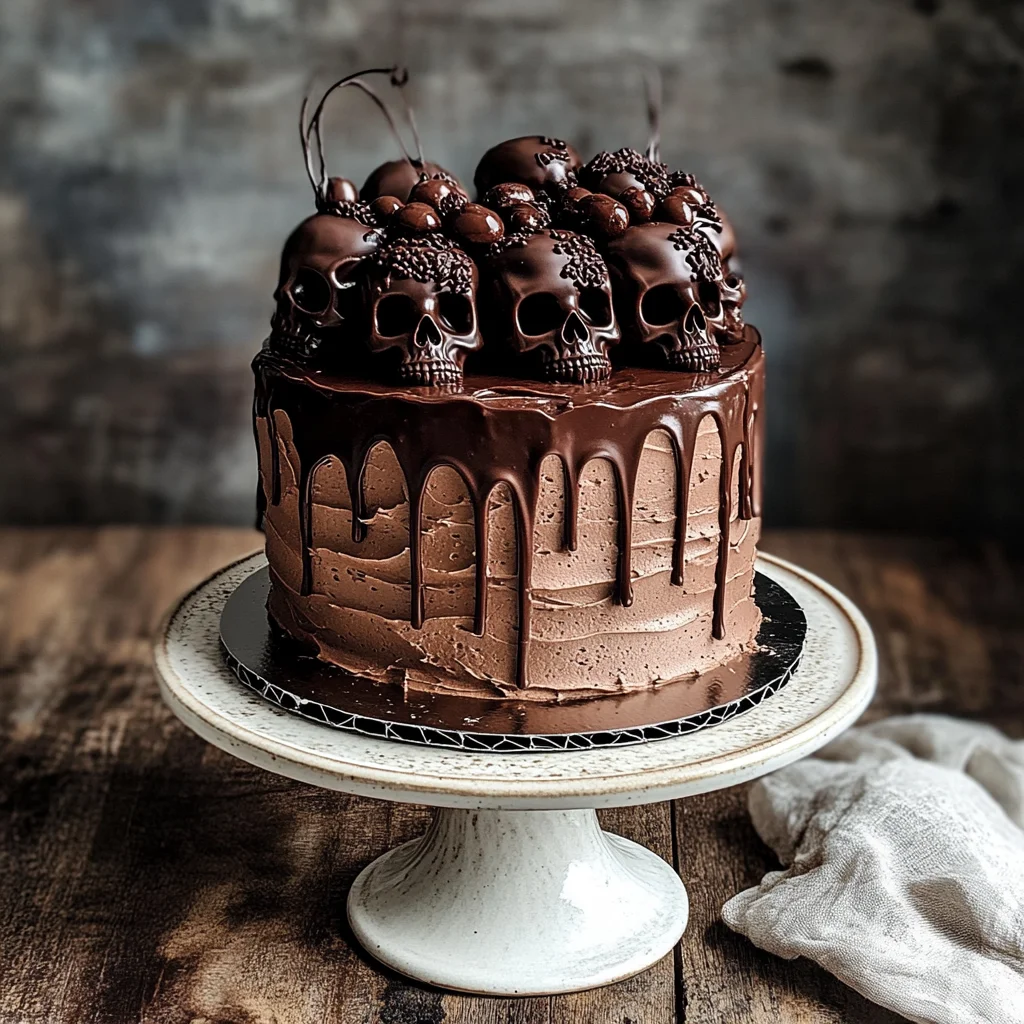
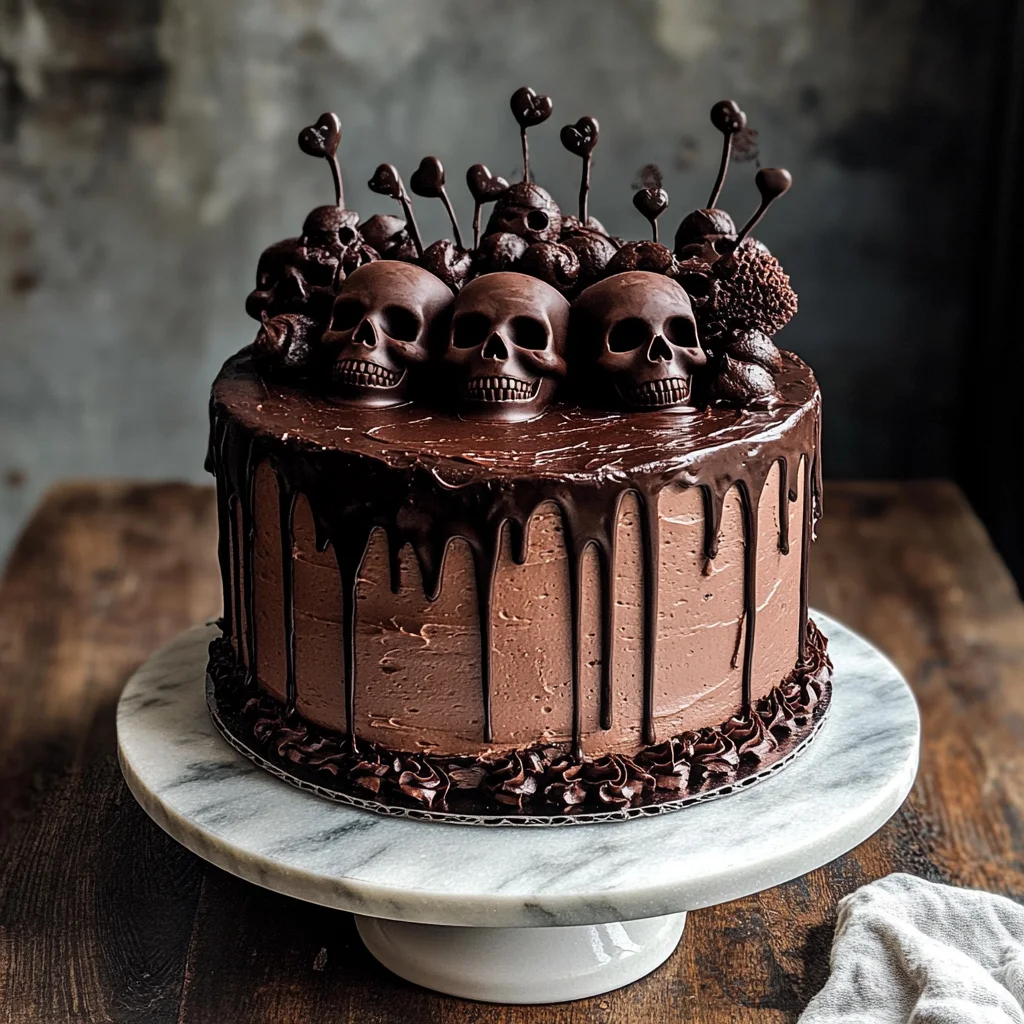
Vegan Chocolate Layer Skull Cake
If deep, dark chocolate cravings have been haunting you, try this decadent vegan chocolate layer skull cake… if you dare! Filled and coated with a lush chocolate buttercream, dripped in a satiny ganache and topped with pure chocolate skulls, this is one wicked cake! Perfect for Halloween parties or any special occasion, the Vegan Chocolate Layer Skull Cake will impress your guests with its spooky design and rich flavors.
Why You’ll Love This Recipe
- Decadent Flavor: The combination of dark vegan chocolate and rich cocoa creates an indulgent taste that even non-vegans will love.
- Eye-Catching Design: The skull shape makes it a standout centerpiece for Halloween or themed parties.
- Easy to Make: This recipe is straightforward, allowing bakers of all levels to create something stunning without stress.
- Versatile Serving Options: Enjoy it as a dessert at dinner parties or as a fun treat for kids’ gatherings.
- Plant-Based Goodness: Crafted entirely from vegan ingredients, it caters to various dietary preferences without sacrificing taste.
Tools and Preparation
To prepare the Vegan Chocolate Layer Skull Cake, you’ll need some essential tools and equipment. Having the right tools on hand will make your baking experience smoother and more enjoyable.
Essential Tools and Equipment
- Mixing bowls
- Electric mixer (or whisk)
- Measuring cups and spoons
- Baking pans (skull-shaped if available)
- Cooling rack
Importance of Each Tool
- Mixing bowls: Essential for combining dry ingredients and mixing batters evenly.
- Electric mixer: Makes whipping buttercream quick and effortless for a smooth consistency.
- Baking pans: A good quality pan helps ensure even baking and easy release of your cake.
- Cooling rack: Allows cakes to cool properly, preventing sogginess.
Ingredients
For the Vegan Chocolate Layer Skull Cake, gather the following ingredients:
For the Cake
- 1 1/2 cups hot coffee or Americano
- 75 g good quality dark vegan chocolate, chopped
- 3 cups all-purpose flour
- 2 2/3 cups granulated sugar
- 1 1/2 cups unsweetened Dutch-process cocoa powder
- 2 1/4 tsp baking powder
- 1 1/2 tsp sea salt
- 3/4 tsp baking soda
- 1 1/2 cups plant-based milk
- 3/4 cup neutral oil (e.g. canola, avocado, rapeseed, etc)
- 1/4 cup white vinegar (or apple cider vinegar)
- 1 tbsp vanilla extract
For the Buttercream Frosting
- 75 g good quality dark vegan chocolate, chopped
- 1 cup vegan butter (baking stick, not tub style), room temperature
- 1/2 cup unsweetened Dutch-process cocoa powder
- 5 cups confectioners’ sugar, sifted
- 2-4 tbsp plant-based milk
- 1 tsp vanilla extract
For the Ganache & Decorations
- 1/4 cup canned coconut milk (not coconut beverage)
- 80 g good quality dark vegan chocolate (70% cacao is nice without being bitter)
- 1/2-1 kg dark vegan chocolate, chopped (70% cacao or higher for nice dark skulls)
How to Make Vegan Chocolate Layer Skull Cake
Step 1: Preheat the Oven
Preheat your oven to 350°F (175°C). Prepare your skull-shaped baking pans by greasing them lightly with oil or lining them with parchment paper.
Step 2: Melt the Chocolate
In a mixing bowl, combine hot coffee with chopped dark vegan chocolate. Stir until melted and smooth. Set aside to cool slightly.
Step 3: Mix Dry Ingredients
In another large bowl, mix together all-purpose flour, granulated sugar, unsweetened cocoa powder, baking powder, sea salt, and baking soda. Whisk until well combined.
Step 4: Combine Wet Ingredients
In a separate bowl, combine plant-based milk, neutral oil, vinegar, and vanilla extract. Pour in the melted chocolate mixture once cooled slightly.
Step 5: Combine All Mixtures
Gradually add the wet ingredients into the dry ingredients. Mix until just combined; do not overmix. Divide the batter evenly between the prepared pans.
Step 6: Bake the Cakes
Bake in preheated oven for about 30 minutes or until a toothpick inserted into the center comes out clean. Allow cakes to cool in pans for about 10 minutes before transferring them to a cooling rack.
Step 7: Prepare Buttercream Frosting
While cakes are cooling, beat together room temperature vegan butter and cocoa powder until creamy. Gradually add confectioners’ sugar while mixing on low speed. Add plant-based milk as needed for desired consistency.
Step 8: Assemble the Cake
Once cakes are completely cooled, place one layer on a serving plate. Spread a layer of buttercream frosting on top before placing the second layer over it. Frost sides and top of cake generously with remaining buttercream.
Step 9: Prepare Ganache
Heat canned coconut milk in a saucepan over medium heat until just simmering. Pour over chopped dark vegan chocolate in a bowl; let sit for a couple of minutes before stirring until smooth. Drizzle ganache over frosted cake.
Step 10: Decorate
Melt additional chopped dark vegan chocolate as needed for decorative skulls. Pour into skull-shaped molds if desired or simply use as drizzles on top of the cake.
Enjoy your Vegan Chocolate Layer Skull Cake at your next gathering!
How to Serve Vegan Chocolate Layer Skull Cake
This spooky yet delicious cake is perfect for any Halloween gathering or themed party. Here are some creative serving suggestions to elevate your dessert experience.
Slice and Serve
- Serve classic slices of the vegan chocolate layer skull cake on individual plates, garnished with a dusting of cocoa powder or powdered sugar for an elegant touch.
Pair with Vegan Ice Cream
- A scoop of rich vegan vanilla ice cream complements the chocolate layers beautifully, adding a creamy contrast that everyone will enjoy.
Add Fresh Berries
- Top each slice with fresh raspberries or strawberries for a pop of color and a tart flavor that balances the sweetness of the cake.
Create Cake Pops
- Transform leftover slices into fun cake pops by crumbling them, mixing with frosting, and rolling into balls. Dip in dark chocolate and decorate for an extra festive look.
Decorate with Edible Flowers
- Use edible flowers like pansies or violets to add a vibrant and natural touch to your served slices, enhancing their visual appeal.
Serve with Coffee or Tea
- Pair slices with a warm cup of coffee or herbal tea to enhance the flavors of the cake, making it an indulgent after-meal treat.
How to Perfect Vegan Chocolate Layer Skull Cake
Getting your vegan chocolate layer skull cake just right can take some practice. Here are some tips to help you achieve perfection.
- Use hot coffee: Adding hot coffee helps enhance the chocolate flavor and creates a moist texture in your cake.
- Measure accurately: Accurate measurements ensure consistent results; using kitchen scales can help achieve precision.
- Sift dry ingredients: Sifting flour, cocoa powder, and confectioners’ sugar eliminates lumps and ensures even mixing for a smoother batter.
- Let cool completely: Allow the cakes to cool fully before frosting; this prevents the frosting from melting and keeps layers intact.
- Chill ganache before use: Chilling your ganache slightly allows it to thicken and become easier to pour over the cake without sliding off too much.
- Experiment with decorations: Get creative with decorations like chocolate shavings or spooky edible decorations that fit your theme.
Best Side Dishes for Vegan Chocolate Layer Skull Cake
Pairing your vegan chocolate layer skull cake with delightful side dishes can elevate the overall dining experience. Here are some great options:
-
Vegan Fruit Salad
A refreshing mix of seasonal fruits adds brightness and balances out the richness of the cake. -
Coconut Whipped Cream
Light and airy whipped coconut cream provides a delightful topping that complements the dense chocolate layers. -
Chocolate-Covered Strawberries
These sweet treats make for an indulgent pairing while staying on theme for a chocolate-focused dessert table. -
Spiced Nuts
A mix of spiced nuts offers a crunchy contrast to the soft cake texture and enhances its flavor profile. -
Vegan Chocolate Mousse
A silky mousse serves as a luxurious addition to your dessert spread that guests will love digging into alongside their slice of cake. -
Chilled Hibiscus Iced Tea
This floral beverage pairs beautifully with chocolate desserts, offering refreshing notes that cut through sweetness. -
Classic Vegan Biscotti
Crunchy biscotti can be dipped in coffee or enjoyed alongside slices for added texture and flavor variety. -
Maple Roasted Pumpkin Seeds
These sweet-and-salty snacks provide an unexpected crunch and playfully tie into any fall-themed dessert table.
Common Mistakes to Avoid
To ensure your Vegan Chocolate Layer Skull Cake turns out perfectly, avoid these common mistakes.
- Using the wrong chocolate: Always opt for good quality dark vegan chocolate to achieve that rich flavor. Check for labels to confirm it’s vegan.
- Ignoring ingredient temperatures: Make sure your plant-based milk and vegan butter are at room temperature for a smoother batter. Cold ingredients can lead to a dense cake.
- Not measuring accurately: Use a kitchen scale for precise measurements of dry ingredients like flour and cocoa powder. Inaccurate measurements can affect the cake’s texture.
- Skipping the cooling time: Allowing the cake layers to cool completely before frosting is crucial. If they’re warm, the frosting will melt and create a mess.
- Overmixing the batter: Mix just until combined. Overmixing can develop gluten, making your cake tough instead of tender.
Storage & Reheating Instructions
Refrigerator Storage
- Store in an airtight container for up to 5 days.
- Keep layers separated with parchment paper if stacked to prevent sticking.
Freezing Vegan Chocolate Layer Skull Cake
- Wrap slices tightly in plastic wrap and place in a freezer-safe container.
- Can be frozen for up to 3 months for best quality.
Reheating Vegan Chocolate Layer Skull Cake
- Oven: Preheat to 350°F (175°C) and heat for about 10-15 minutes until warmed through.
- Microwave: Heat individual slices on medium power for 20-30 seconds; check frequently to avoid overheating.
- Stovetop: Use a pan over low heat, cover it with a lid, and warm each slice gently.
Frequently Asked Questions
Here are some common questions about making the Vegan Chocolate Layer Skull Cake.
Can I use other types of milk?
Yes, you can substitute with any plant-based milk such as almond, soy, or oat milk based on your preference.
How do I make the chocolate skulls?
Melt dark vegan chocolate, pour it into skull-shaped molds, and let it set in the fridge until firm.
What can I use instead of vinegar?
You may substitute white vinegar with apple cider vinegar or even lemon juice if needed.
Can I customize this Vegan Chocolate Layer Skull Cake?
Absolutely! You can add nuts, fruit fillings, or different flavors like peppermint or orange zest to make it unique.
Is this recipe suitable for special occasions?
Yes! This cake is perfect for Halloween parties or any festive gathering where you want to impress guests with a creative dessert.
Final Thoughts
The Vegan Chocolate Layer Skull Cake is not only visually striking but also deliciously rich and indulgent. Its versatility allows you to customize flavors and decorations according to your preferences. Give it a try at your next celebration!
Vegan Chocolate Layer Skull Cake
Indulge in the rich, decadent delight of the Vegan Chocolate Layer Skull Cake, a show-stopping dessert perfect for Halloween or any festive gathering. This moist cake, layered with luscious chocolate buttercream and drizzled with silky ganache, not only satisfies deep chocolate cravings but also captivates with its spooky skull design. Crafted entirely from plant-based ingredients, it’s an impressive option that caters to various dietary preferences without compromising on flavor. Whether served at a themed party or enjoyed as an everyday treat, this cake will surely leave a lasting impression on your guests.
- Prep Time: 30 minutes
- Cook Time: 30 minutes
- Total Time: 1 hour
- Yield: Approximately 12 servings 1x
- Category: Dessert
- Method: Baking
- Cuisine: Vegan
Ingredients
- 1 1/2 cups hot coffee
- 75 g dark vegan chocolate
- 3 cups all-purpose flour
- 2 2/3 cups granulated sugar
- 1 1/2 cups unsweetened cocoa powder
- 2 1/4 tsp baking powder
- 1 1/2 tsp sea salt
- 3/4 tsp baking soda
- 1 1/2 cups plant-based milk
- 3/4 cup neutral oil (e.g. canola, avocado, rapeseed, etc)
- 1/4 cup white vinegar (or apple cider vinegar)
- 1 tbsp vanilla extract
- 75 g dark vegan chocolate (for buttercream)
- 1 cup vegan butter (baking stick, not tub style), room temperature
- 1/2 cup unsweetened cocoa powder (for buttercream)
- 5 cups confectioners' sugar, sifted
- 2–4 tbsp plant-based milk (for buttercream)
- 1 tsp vanilla extract (for buttercream)
- 1/4 cup canned coconut milk (for ganache)
- 80 g dark vegan chocolate (for ganache, 70% cacao is nice without being bitter)
- 1/2–1 kg dark vegan chocolate (chopped, 70% cacao or higher for nice dark skulls)
Instructions
- Preheat oven to 350°F (175°C) and prepare your skull-shaped pans.
- Melt dark vegan chocolate with hot coffee; set aside.
- In a bowl, combine flour, sugar, cocoa powder, baking powder, salt, and baking soda.
- In another bowl, mix plant-based milk, oil, vinegar, vanilla extract, and melted chocolate.
- Gradually add wet ingredients to dry ingredients; mix until just combined.
- Divide batter into pans and bake for about 30 minutes until a toothpick comes out clean.
- Cool cakes before frosting with buttercream made from vegan butter and cocoa powder.
- Prepare ganache by heating coconut milk and mixing with chopped dark chocolate; drizzle over the frosted cake.
Nutrition
- Serving Size: 1 slice (80g)
- Calories: 320
- Sugar: 36g
- Sodium: 210mg
- Fat: 14g
- Saturated Fat: 6g
- Unsaturated Fat: 8g
- Trans Fat: 0g
- Carbohydrates: 45g
- Fiber: 5g
- Protein: 4g
- Cholesterol: 0mg